WebDAV walkthrough
Introduction
Typically, DataLad workflows for publishing data to external providers involve some repository hosting service (like GitHub or GitLab). This service holds the "Git" part of the dataset: dataset history (commit messages), non-annexed files (usually code, text), and file identity information for all annexed files (file name, but not content). These workflows will often pair the repository hosting service with a non-specialized hosting service (like Dropbox or AWS S3), which doesn't understand Git, but can hold annexed file content (however, some services are able to store both parts, e.g. GIN):
The datalad-next extension introduces a possibility to bypass the need for Git storage, and to deposit the entire dataset on a regular hosting service. Internally, this is achieved by packaging the "Git" part and depositing it alongside the annexed data. A complete solution has been implemented for services which support WebDAV [1] (eg. Sciebo, Dracoon, EUDAT B2DROP).
The primary use case for WebDAV siblings is dataset deposition, where only one site is uploading dataset and file content updates for others to reuse. Compared to workflows which use repository hosting services, this solution will be less flexible for collaboration (because it's not able to utilise features for controlling dataset history offered by repository hosting services, such as pull requests and conflict resolution), and might be slower (when it comes to file transfer). What it offers, however, is the ability to make the published dataset browsable like regular directories on the WebDAV service while being cloneable through datalad.
The walkthrough below demonstrates a basic workflow with two distinct publication modes available in create_sibling_webdav. A short demonstration can also be found in this video on DataLad's YouTube channel.
Enabling DataLad Next
First, we need to install datalad-next. Assuming we are using a Python virtual environment (you can adapt this to conda, virtualenvwrapper, or use no virtual environments at all):
virtualenv --python=python3 ~/env/dl-next
source ~/env/dl-next/bin/activate
python -m pip install datalad-next
Next, we need to set a configuration option which tells DataLad that we want to enable this extension for auto-loading (meaning in practice that we allow this extension to alter the behaviour of core datalad methods, such as push):
git config --global --add datalad.extensions.load next
After completing the walkthrough, we could disable this option with a similar command, using --unset instead of --add.
Example dataset
First, let's create an example dataset with some files (a photo of a cat and and a text file). With the default configuration, both files will be annexed:
datalad create example
cd example
wget -nv "https://unsplash.com/photos/gKXKBY-C-Dk/download?force=true" -O cat.jpg
echo "Hello world" > README.md
datalad save -m "Add contents"
Filetree mode publication
The 'filetree' mode offers a human-readable data organization on the WebDAV remote that matches the file tree of a dataset. However, it can, consequently, only store a single version of each file in the file tree. This mode is useful for depositing a single dataset snapshot for consumption with or without DataLad. While point-and-click access may be the primary reason for using this mode, such a single-version dataset can still be DataLad-cloned: consumers will obtain the full dataset history (commit history), but will not be able to check out previous versions of annexed files.
We first need to know the WebDAV URL of the location we wish to export to. Usually you can find the WebDAV URL in the web interface [2] of your hosting service. It will probably look similar to one of those (substitute your own in the remaining examples):
https://example.com/webdav/homedir/subdir
https://example.com/remote.php/dav/files/username/subdir
Then, let's create a WebDAV sibling. You may add components to the path to create folders:
datalad create-sibling-webdav \
  --dataset . \
  --name dav1 \
  --mode filetree \
  https://example.com/webdav/homedir/subdir/filetree-mode
At this point you should be prompted for your username and a password [3]. They will be saved by DataLad in your system's keyring for future connections to this hosting service. At this point, you should see a create_sibling_webdav(ok) result.
Let's inspect the resulting siblings configuration. Calling datalad siblings should produce the following output:
❱ datalad siblings
.: here(+) [git]
.: dav1(-) [datalad-annex::?type=webdav&encryption=none&exporttree=yes&url=https%3A//example.com/webdav/homedir/subdir/filetree-mode (git)]
.: dav1-storage(+) [git]
The command created two siblings: one using the name we chose (dav1), and the other with an additional 'storage' suffix (dav1-storage). The first will contain the "Git" part of the dataset, and the other will carry the annexed content. Additionally, the command created a publication dependency between the two, meaning that pushing to dav1 will trigger a push to dav1-storage first [4]. The dav1 sibling was recorded with a special URL starting with datalad-annex:: which encodes information needed by DataLad.
We can now push to the dav1 sibling:
datalad push --to dav1
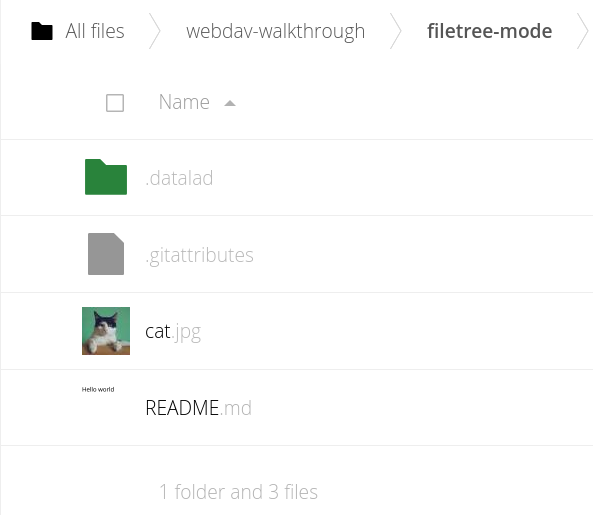
We can preview the results in the web interface. The files are now exported in the same file tree that we had locally, i.e. in a layout which is human readable but can only contain the latest version of files. Additionally, there is a .datalad hidden directory (you may need to enable an option to show hidden files in your web interface to see it), where a compressed Git history was written:
Annex mode publication
In contrast to the 'filetree' mode, the 'annex' mode is capable of storing any number of historical file versions using a content hash layout. This means that the publication will be complete, but the directory layout will not be human-readable and will best be consumed with DataLad.
Since a dataset can have multiple siblings, let's create a new one in the filetree mode. Once again we are using the create-sibling-webdav command, this time with a different mode, a new name, and a WebDAV URL pointing to a different folder:
datalad create-sibling-webdav \
  --dataset . \
  --name dav2 \
  --mode annex \
  https://example.com/webdav/homedir/subdir/annex-mode
At this point, DataLad would prompt for a password. However, the password has already been stored after we created the first sibling, so no prompt appears in this case.
As previously, datalad siblings should show that two new siblings were created:
❱ datalad siblings
.: here(+) [git]
.: dav2(-) [datalad-annex::?type=webdav&encryption=none&exporttree=no&url=https%3A//example.com/webdav/homedir/subdir/annex-mode (git)]
.: dav2-storage(+) [git]
(...)
And, just as previously, the siblings have a publication dependency, so we can push to the dav2 sibling:
datalad push --to dav2
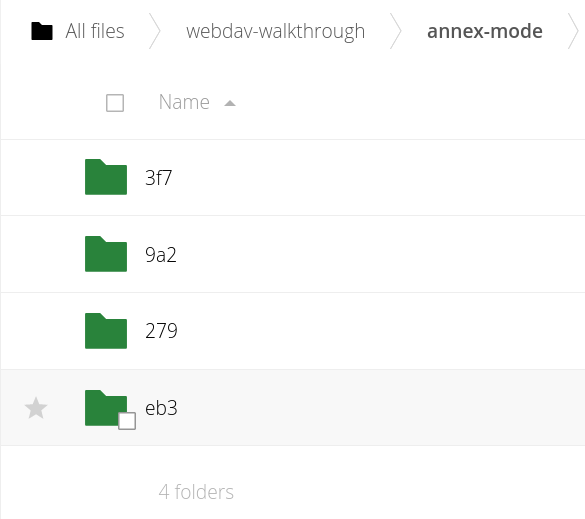
We can preview the effect in the web interface. The files are organised by the content hash, in a layout which isn't human readable, but can store multiple historical versions of files:
Cloning from WebDAV
We can now get into a consumer's shoes and clone the dataset. This operation also requires having datalad-next enabled. There is one additional step: we need to tweak the WebDAV URL originally used with create_sibling_webdav, so that the clone command knows how to deal with it:
- for annex and filetree modes, we could use the datalad-annex:: URL generated for our sibling (reported by datalad siblings) [5]
- for the filetree mode it's easier to use a convenience method, and replace https with webdavs in the original WebDAV URL.
For the sake of demonstration we will clone from the filetree-mode sibling (but you can try either):
cd ..
datalad clone webdavs://example.com/webdav/homedir/subdir/filetree-mode clone-from-export
At this point, the consumer would get prompted for their own credentials to the hosting service (which would also determine whether they are allowed to access the given content). However, since we are cloning the dataset exported previously, DataLad is using stored credentials.
The clone command should display a message saying that a storage sibling has not been auto-enabled, and instructing us how to do this manually:
❱ datalad clone webdavs://example.com/webdav/homedir/subdir/filetree-mode clone-from-export
[INFO   ] Remote origin uses a protocol not supported by git-annex; setting annex-ignore
[INFO   ] access to 1 dataset sibling dav1-storage not auto-enabled, enable with:
            datalad siblings -d "/home/username/Documents/test-next/clone-from-export" enable -s dav1-storage
install(ok): /home/mszczepanik/Documents/test-next/clone-from-export (dataset)
Let's enable the storage sibling [6]:
cd clone-from-export
datalad siblings enable -d . -s dav1-storage
This will allow us to obtain the file content, thus completing the publish-consume workflow:
datalad get cat.jpg README.md
Notes
- The create_sibling_webdav documentation has all the details, including modes to create siblings for only data or only Git (annex-only, filetree-only, git-only), and explicit credential specification (to record or reuse explicitly named credentials, for example if you have multiple accounts on a given server).
- datalad-next also introduces the credentials command to query, set, or remove stored credentials. Read more in the credentials documentation.
- The low-level operations are carried out by git-annex. Git-annex caches the WebDAV usename and password in a read-only file, .git/annex/creds/<annex UUID>. This is considered safe, because this file is local (it is never published anywhere), and only the user who created the dataset has read permissions for this file. It is, however, a plaintext file, and therefore may pose a security threat e.g. if other people are sharing the user account.
- The DataLad Handbook's Third Party Infrastructure chapter contains several walk-throughs describing different publication scenarios.
Footnotes
| [1] | WebDAV is an extension of HTTP protocol which allows content creation on an HTTPS server. |
| [2] | In Dracoon, right click a folder and choose "Copy WebDAV path". In Sciebo's "old" interface, click on settings on the lower left of the page. |
| [3] | Consider using tokens, if your service permits. They are like passwords, but can be generated per-application as a security measure to hide your actual password used for web interface login. E. g. in Sciebo you can create them in your account settings in the Security tab. |
| [4] | The publication dependency is a local setting (it only affects the original dataset clone used to push, not any of the following clones); you can see that it is present by looking into the hidden .git/config file, e. g. with cat .git/config. |
| [5] | Technical details on the anatomy of datalad-annex URL can be found in the documentation of datalad-anex Git remote helper |
| [6] | As a side note, the source dataset has two annex-carrying siblings which could potentially be enabled from its clones. However, in our example we pushed to dav1 only before dav2(-storage) was added, so a clone made from dav1 only contains information about dav1-storage. |