Z03 - Digital Signatures
The data entry form supports the submission of a digital signature for each data record to verify submissions and submitter identities. The form generates a fingerprint for a record after clicking the "Validate input/Eingaben prüfen" button at the bottom of the form. This fingerprint is a short representation of the complete data entered into the form.
In order to verify that a specific user has entered the respective data into the form, the user can digitally sign the fingerprint with a private key that is specific to the user. Once the fingerprint is signed, the public key of the user can used to ensure that they did indeed enter the data that lead to the signed fingerprint.
There are a number of different ways to create appropriate keys and to sign data. We recommend to use PGP (Pretty Good Privacy), a standard tool that allows key-creation, data-signing and signature-verification.
Generation and authentication of recognized PGP keys must be coordinated with the Z03 project. Further instructions on performing digital signatures can be found below.
Instructions for Windows
Preparation
- Install GPG4Win (free software, available from https://www.gpg4win.org/get-gpg4win.html). After successful installation the application "Kleopatra” will be available on your machine. The software can be installed with defaults, however, it is only important that the "Kleopatra" component is installed and enabled.
- Start "Kleopatra".
- Create or import a GPG-Keypair (this process is defined and managed by the Z03 management).
Signing
- Start "Kleopatra" (usually done automatically).
- Enter data on https://sfb1451.inm7.de/z03-db and click "Eingaben prüfen".
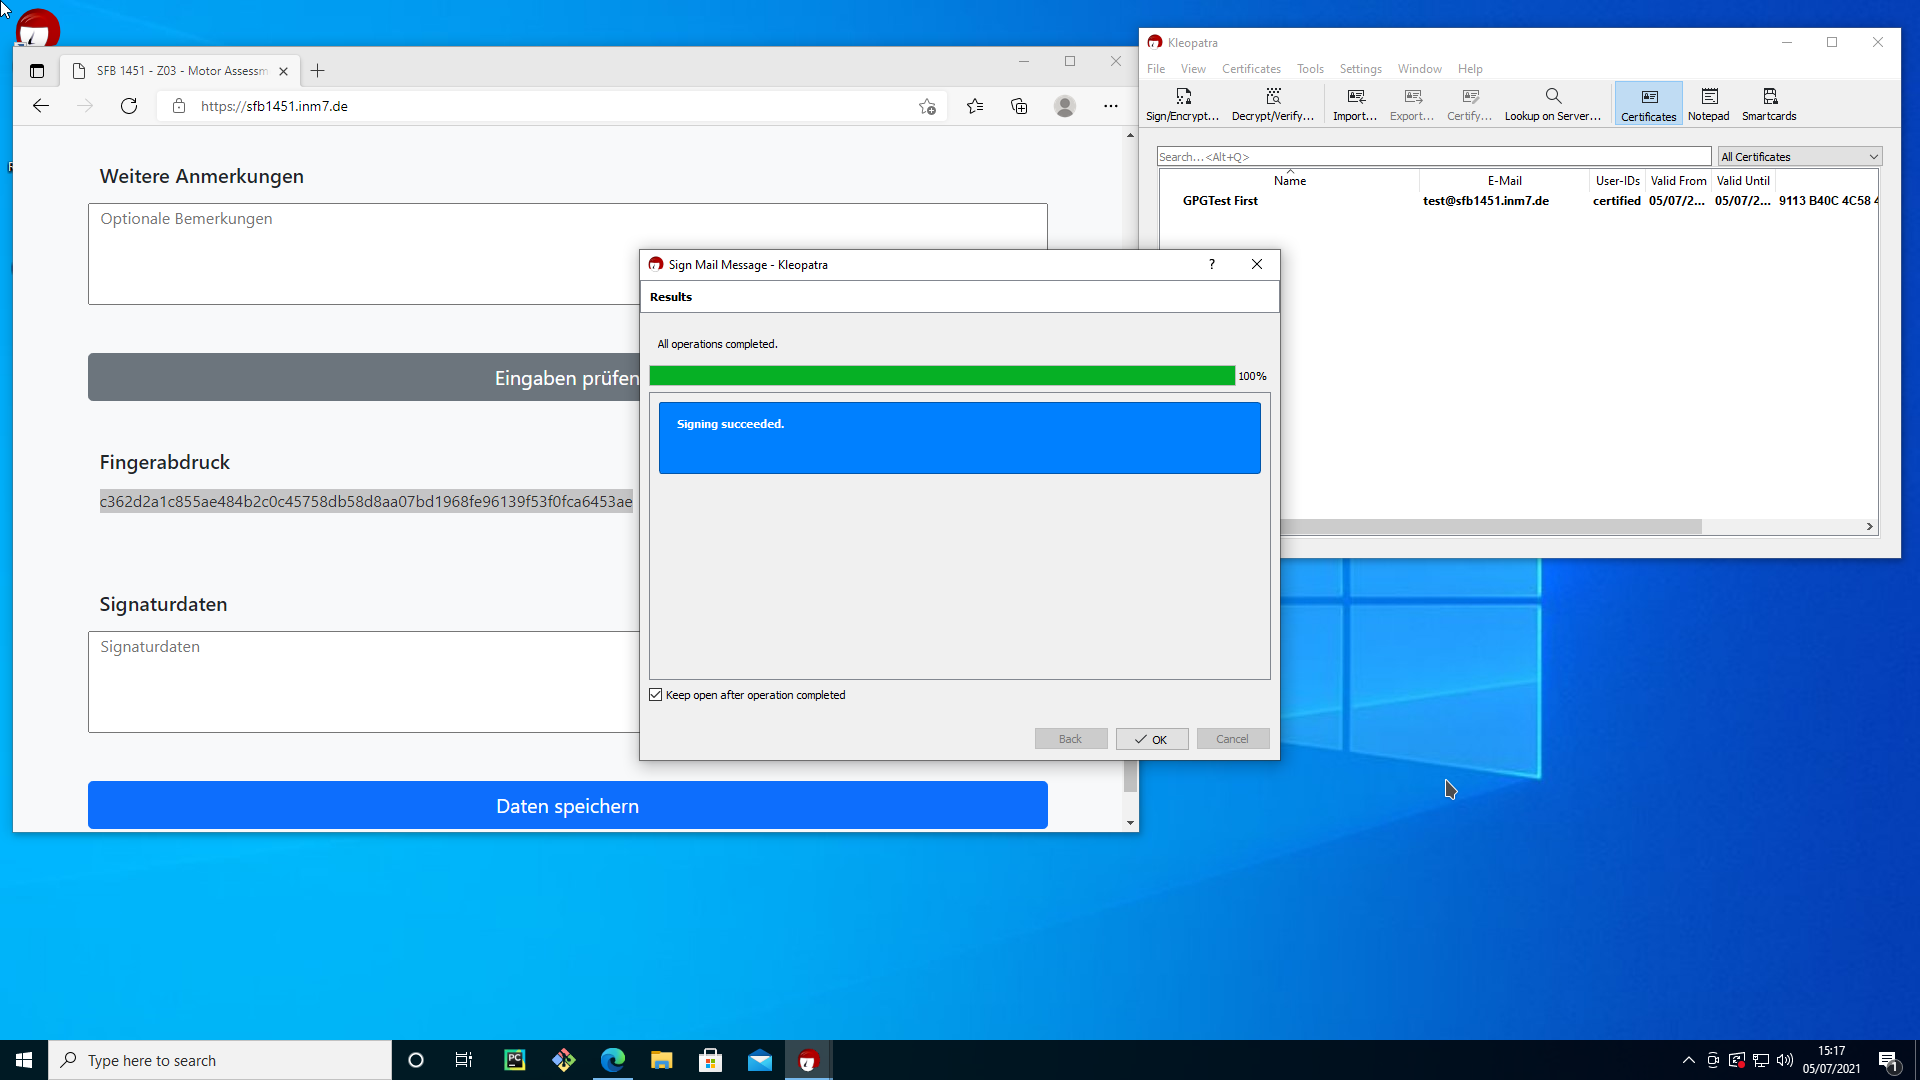
- After successful data verification: copy the "Fingerabdruck" (64 letters or digits) into the clipboard by selecting it and pressing CTRL-C (or by right-clicking and selecting "Copy").
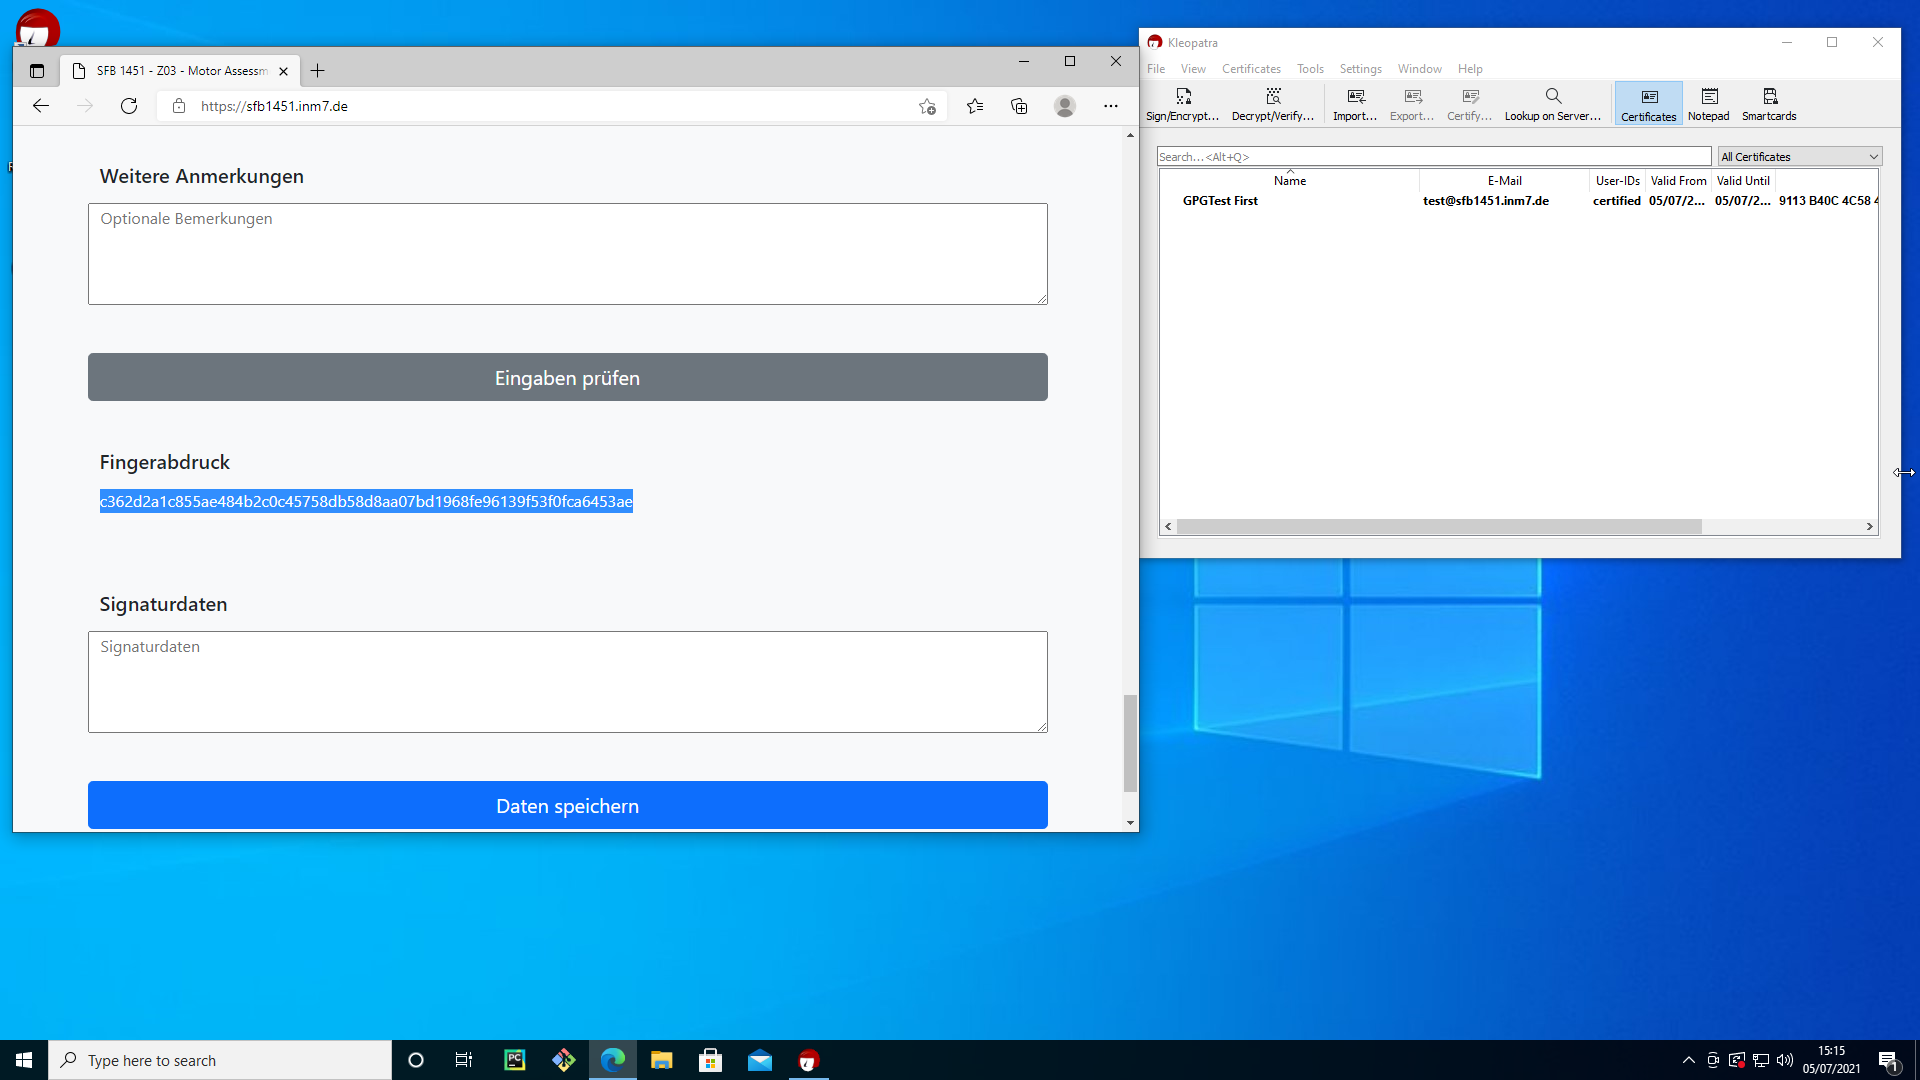
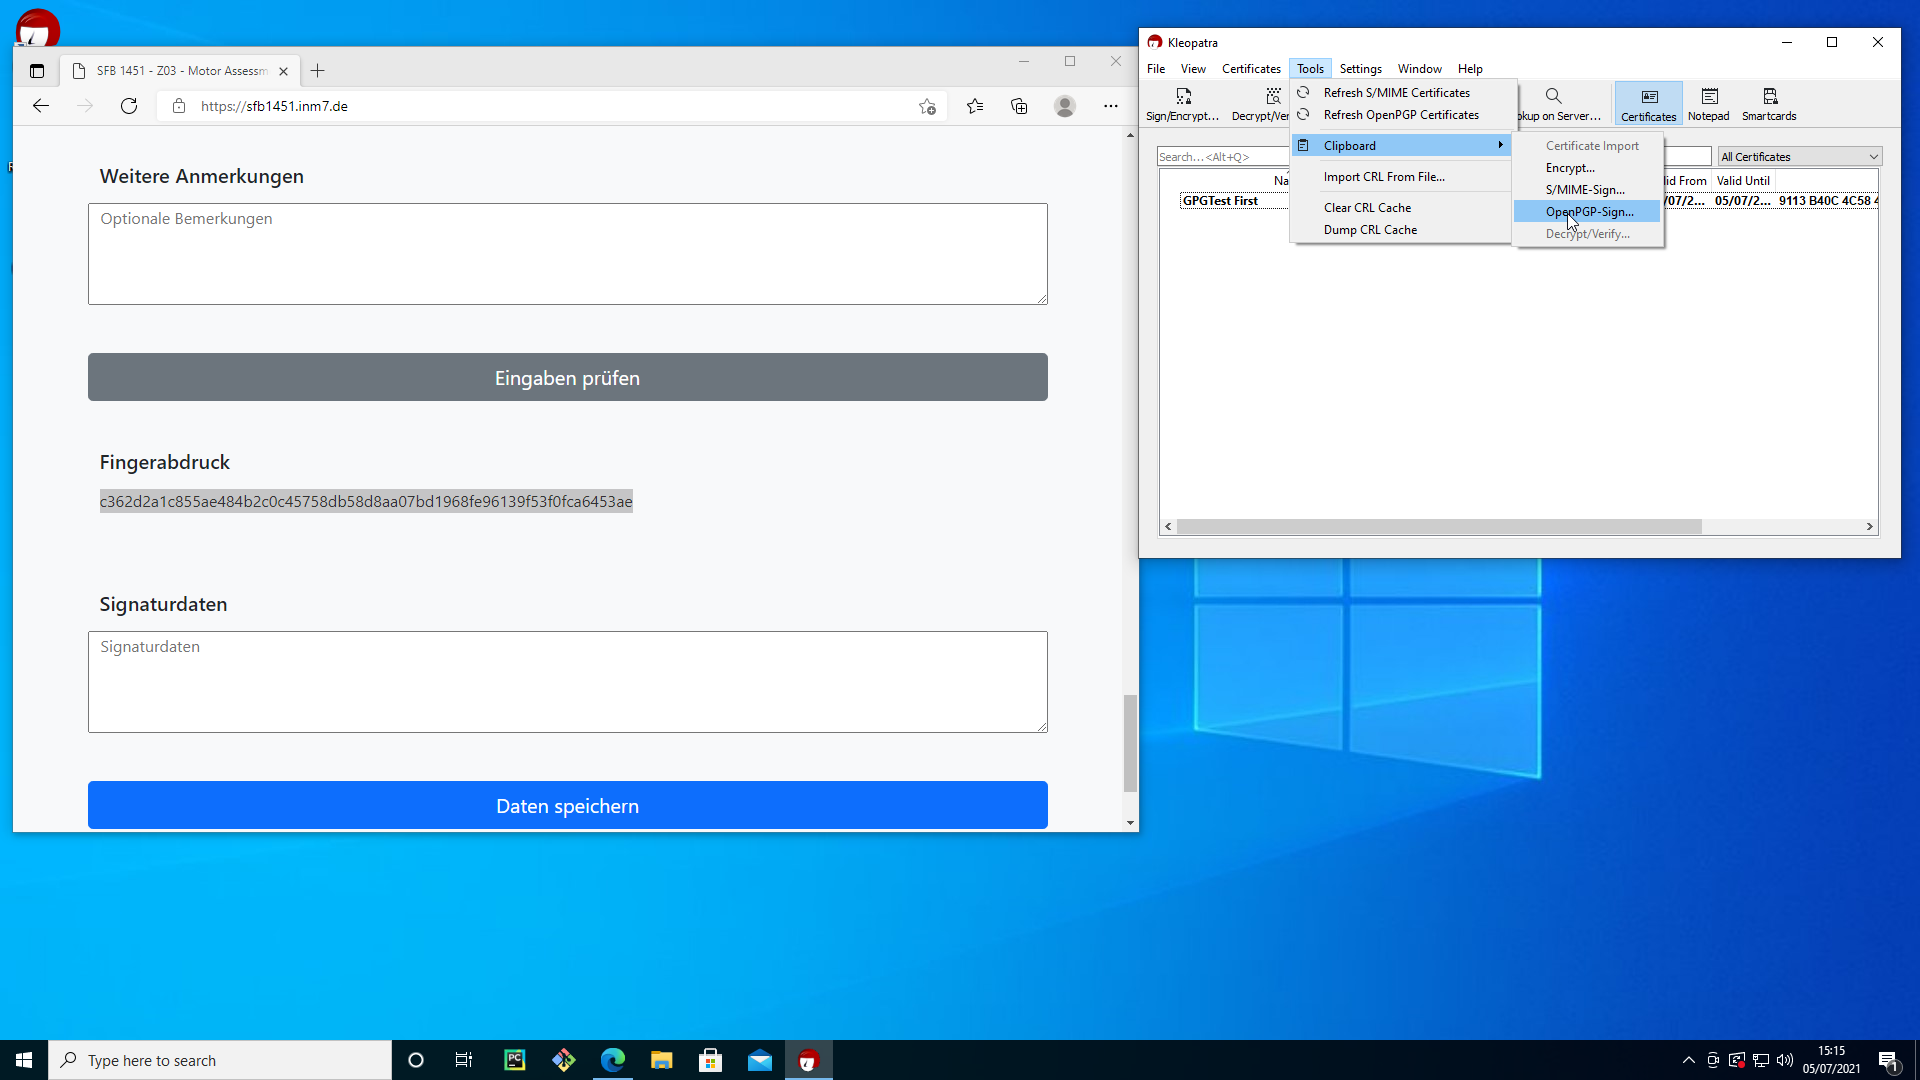
- In the "Kleopatra" application left-click on menu "Tools", submenu "Clipboard", subsubmenu "OpenPGP-Sign" (alternatively you can right-click on the red "Kleopatra "icon in the task bar and select "Clipboard -> OpenPGP-Sign").
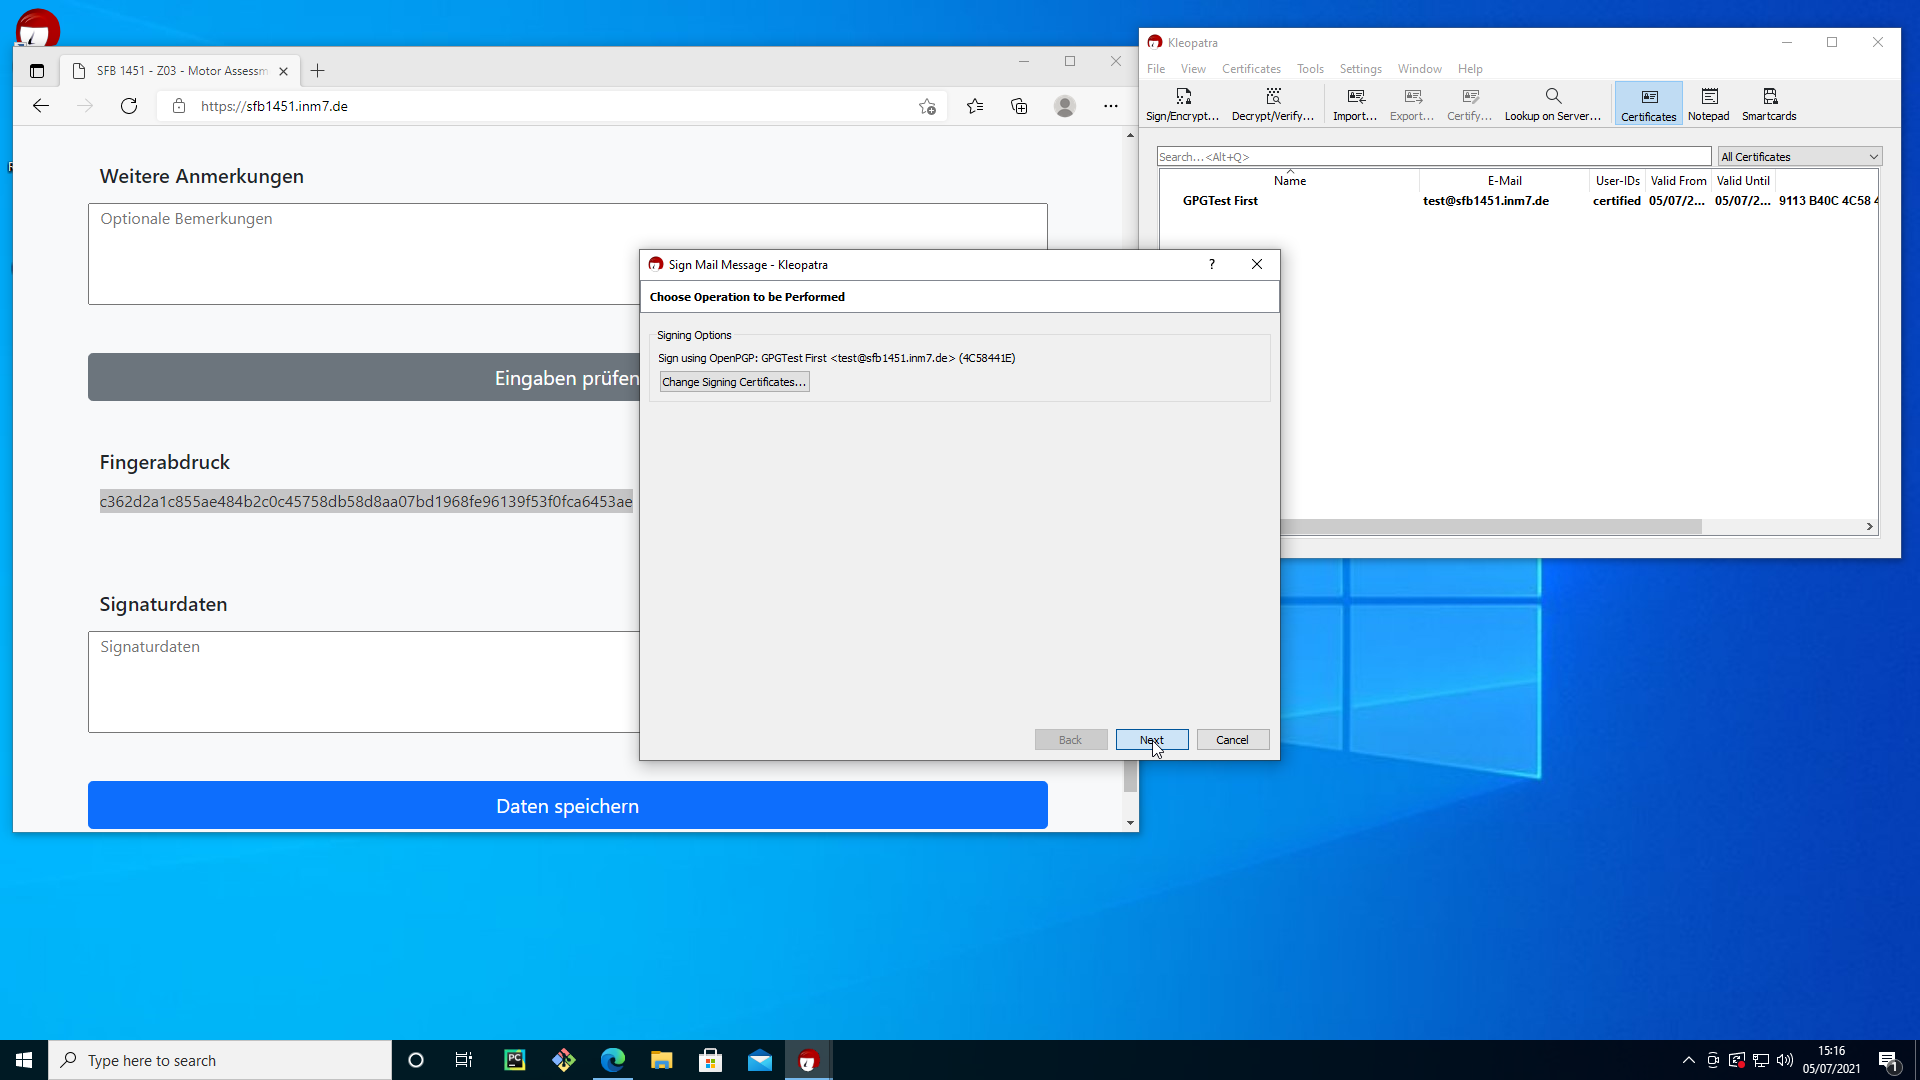
- In the dialog choose the digital key that should be used to sign the data (if there are multiple keys, please chose your key) and click on "Next".
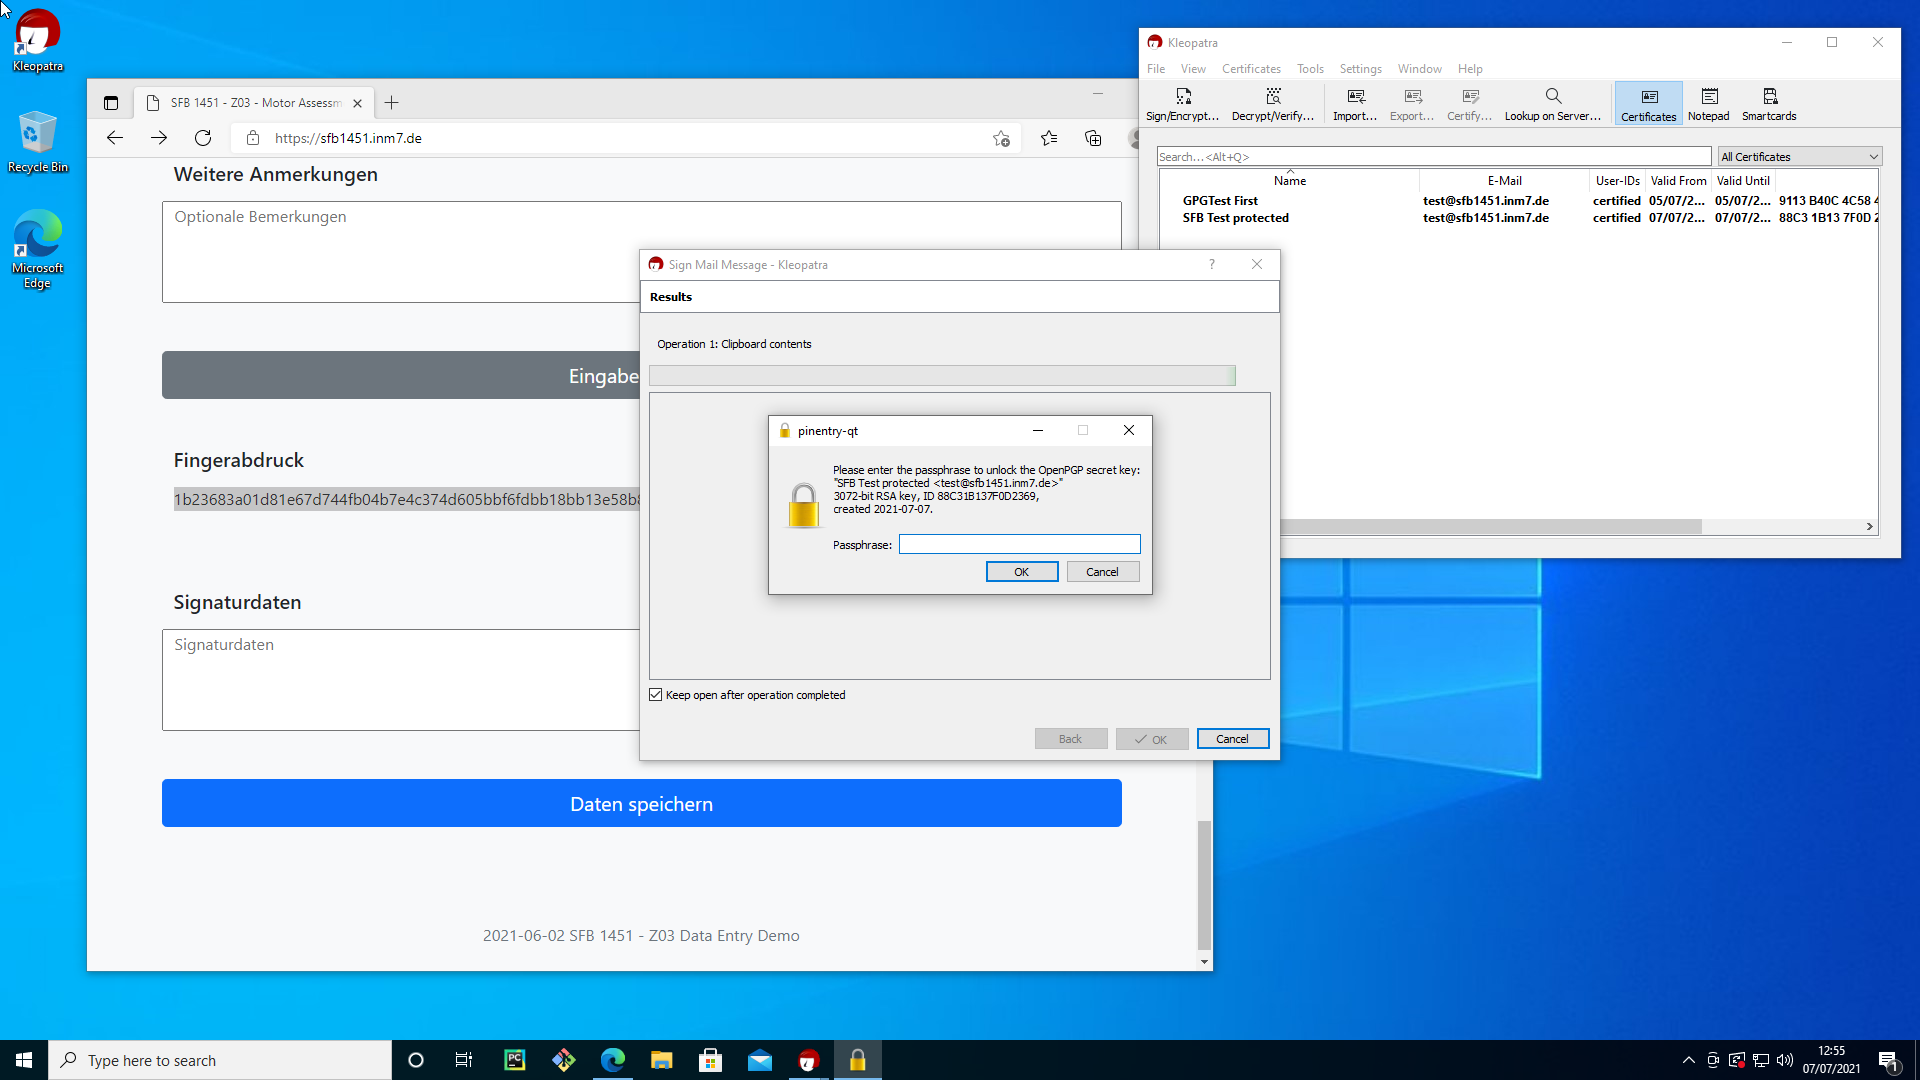
- If your private key is protected against unauthorized use (as it should be), you will be asked for a password to access the private key. In this case enter the password and click "OK" (you should have received the password from Z03 management).
- If the signing succeeds a success message is shown. Click "OK", the digital signature is now available in the clipboard.
- Paste the digital signature in to the field "Signaturdaten" by selecting the text entry area and pressing CTRL-V (or by right-clicking on the text entry area and selecting "Paste").
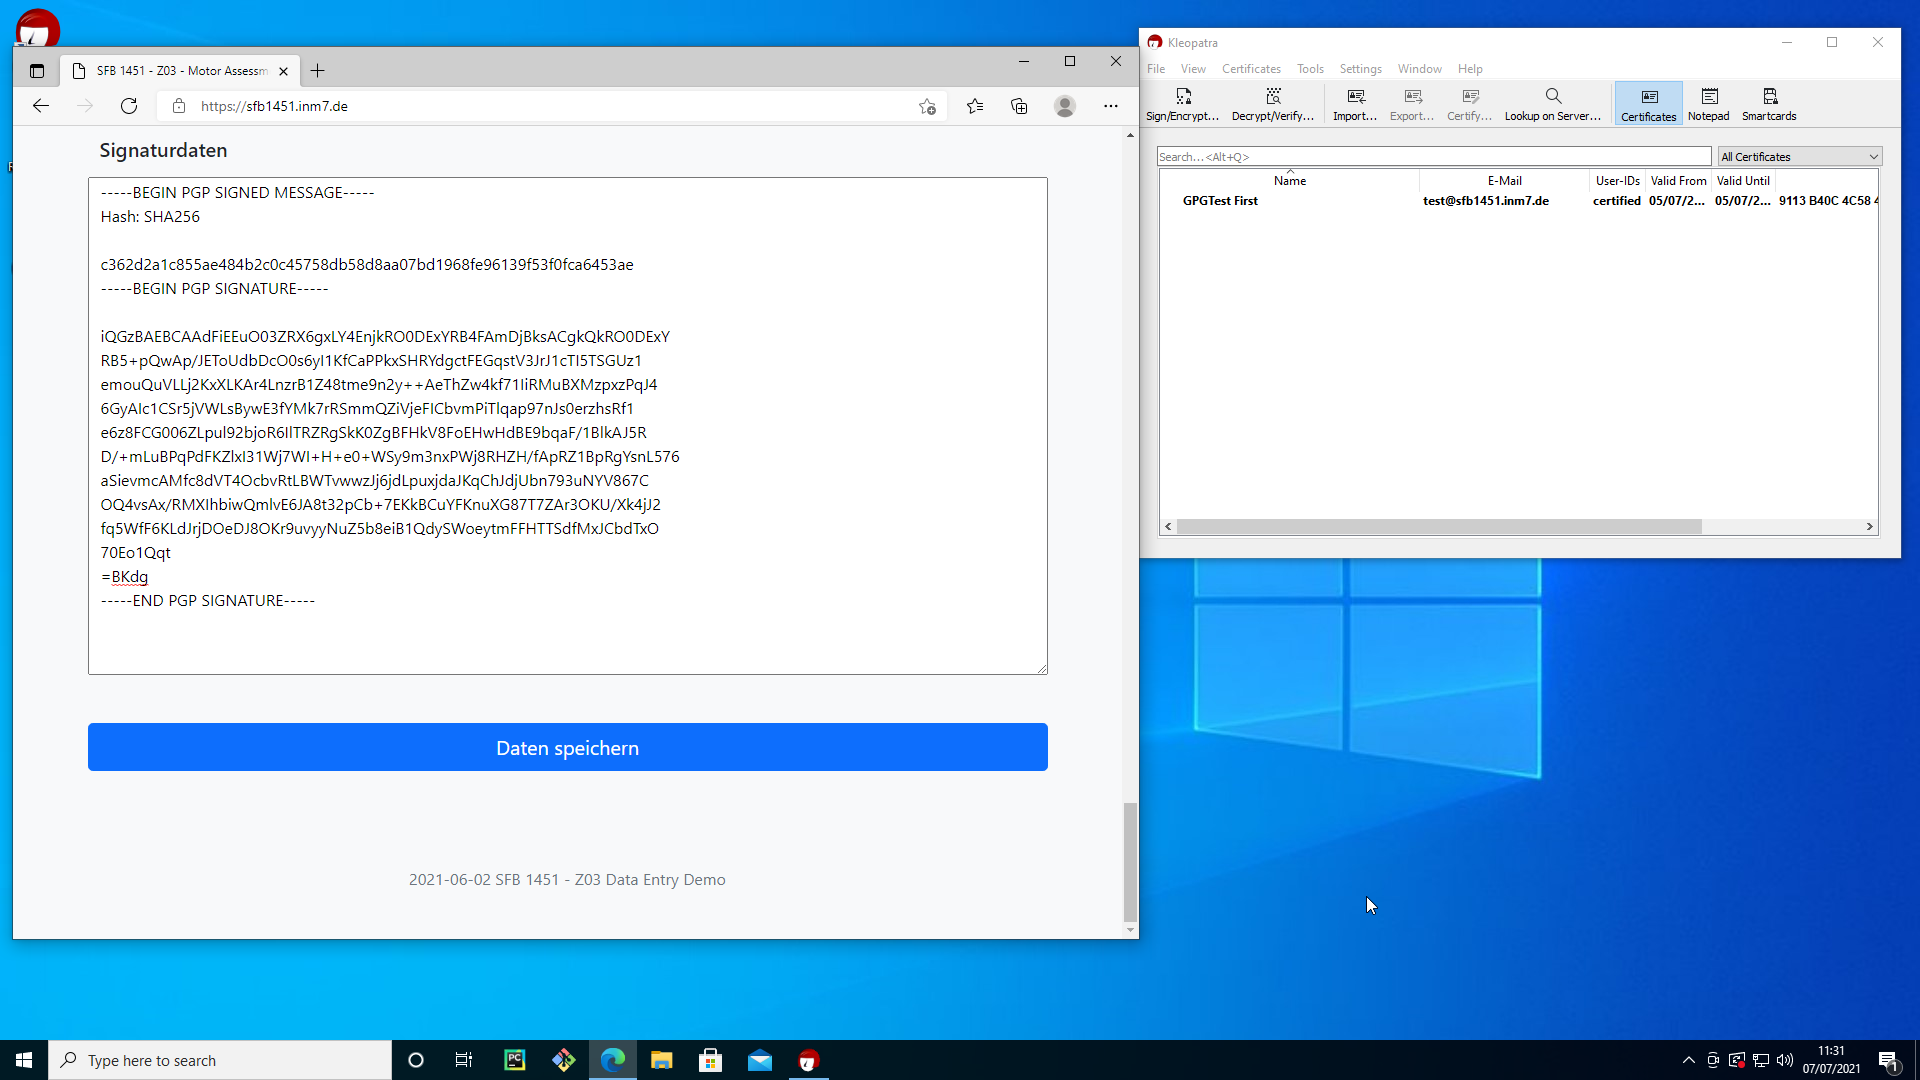
- Submit the form by clicking "Daten speichern".
Instructions for MacOS
If you use MacOS, we suggest that you use the command line GPG client. Even if you are unfamiliar with the command line use, it will speed up your signing process significantly and supports the same signature format as the GPG4Win on Windows.
Please note that you might need administrator privileges to install the GPG-client, i.e. your account has to be an account with administrator rights.
Preparation
Open a terminal window by starting Applications -> Utitities -> Terminal.app.
Execute the command:
ruby -e "$(curl -fsSL https://raw.githubusercontent.com/Homebrew/install/master/install)"
in the terminal window to install Homebrew. Homebrew is a package management system that makes thousands of software packages available for install on your Mac, among them a GPG client.
Install the GPG client by executing the following command in the terminal: brew install gnupg
Create or import a GPG-Keypair (this process is defined and managed by the Z03 management).
Signing
Enter data on https://sfb1451.inm7.de/z03-db and click "Eingaben prüfen".
After successful data verification: copy the "Fingerabdruck" (64 letters or digits) into the clipboard by selecting it and pressing CMD-C (or by right-clicking and selecting "Copy").
Execute the following command in the terminal window:
pbpaste|gpg --clear-sign|pbcopy
This command puts the digital signature into the clipboard. If the private key is password protected a dialog will open and you have to enter the passphrase to unlock the private key.
NB: you can usually use the CURSOR UP-key in the terminal to get the previously executed command line. That means, once you have typed the command above, you just have to press the CURSOR-UP-key and then press the Return-key to execute the command again.
If more than one key is installed in the GPG client you must select the correct key in the command above. Keys should identified by their ID. You can list all installed keys with the command gpg --list-secret-keys. You might get an output like this:
sec   rsa2048 2021-07-05 [SC] [expires: 2023-07-05]
      C0A2B9931D298E017C057F931E20299A8962D7A0
uid        [ unknown ] Test SFB1451 <test@sfb1451.inm7.de>
ssb   rsa2048 2021-07-05 [E] [expires: 2023-07-05]

sec   rsa2048 2021-07-06 [SC] [expires: 2023-07-06]
      621CCD97461F6FF33348CCC1AC9F29B0B45A2326
uid        [ ultimate ] Test 2 SFB1451 <test2@sfb1451.inm7.de>
ssb   rsa2048 2021-07-05 [E] [expires: 2023-07-06]
In this case you can, for example, select the key with the user id "Test 2 SFB1451" by specifying its id, i.e 621CCD97461F6FF33348CCC1AC9F29B0B45A2326, like this:
pbpaste|gpg --clear-sign -u 621CCD97461F6FF33348CCC1AC9F29B0B45A2326|pbcopy
NB: you can also use the name or email to identify a key, but they might not be unique.
Paste the digital signature in to the field "Signaturdaten" by selecting the text entry area and pressing CMD-V (or by right-clicking on the text entry area and selecting "Paste").
Submit the form by clicking "Daten speichern".
Instructions for GNU/Linux
Preparation
- The GPG command line client will most likely be already installed on your system. You can verify its presence by checking its version in the terminal: gpg --version. If GPG is missing, you can install it using your distribution's package manager (e.g. apt install gpg on Ubuntu or Debian).
- Optionally, you can also install xclip (e.g. apt install xclip) to copy and paste using terminal commands rather than manually.
- Create or import a GPG-Keypair (this process is defined and managed by the Z03 management).
Signing
To sign the form, follow the signing instructions for MacOS above. The only difference is that instead of pbpaste and pbcopy you can use xclip:
xclip -o | gpg --clear-sign | xclip -sel clip
Or, if you don't want to use xclip, you can always manually paste the fingerprint into the terminal and copy the output of echo "Paste fingerprint inside quotes" | gpg --clear-sign.
Interaction with the form and managing multiple keys look the same on MacOS and linux.